The Boy Who Bakes

Edd Kimber
  • Home
  • Recipes
  • My Books
  • Blog
  • Recipe Index
  • About
  • Home
  • Recipes
  • My Books
  • Blog
  • Recipe Index
  • About

Recipes

  • All
  • baking
  • Biscuits and Cookies
  • Breads and Quickbreads
  • Bundts
  • Cakes
  • Chocolate
  • Dessert
  • drinks
  • Holidays
  • Pastry
  • Scones and Quickbreads

No-Knead Everything Bagel Bread

Edd Kimber February 2, 2021

Ok look, I know during the first lockdown last year we all loved sourdough, it was the banana bread for hipsters (I guess that makes me a hipster), we all gave our starters names and we baked a few loaves. I also know that of the many people who learnt to make a starter following my guides here and on instagram, many of you will have let your starter wither and die, and I get it, commitment is hard, sourdough is easy to forget. But now that we are back in lockdown once again, should we be reviving our lacklustre, tired starters? You absolutely can but, if you’re like me and life is a bit much right now, I have a great alternative. No knead bread made in the style of sourdough. 

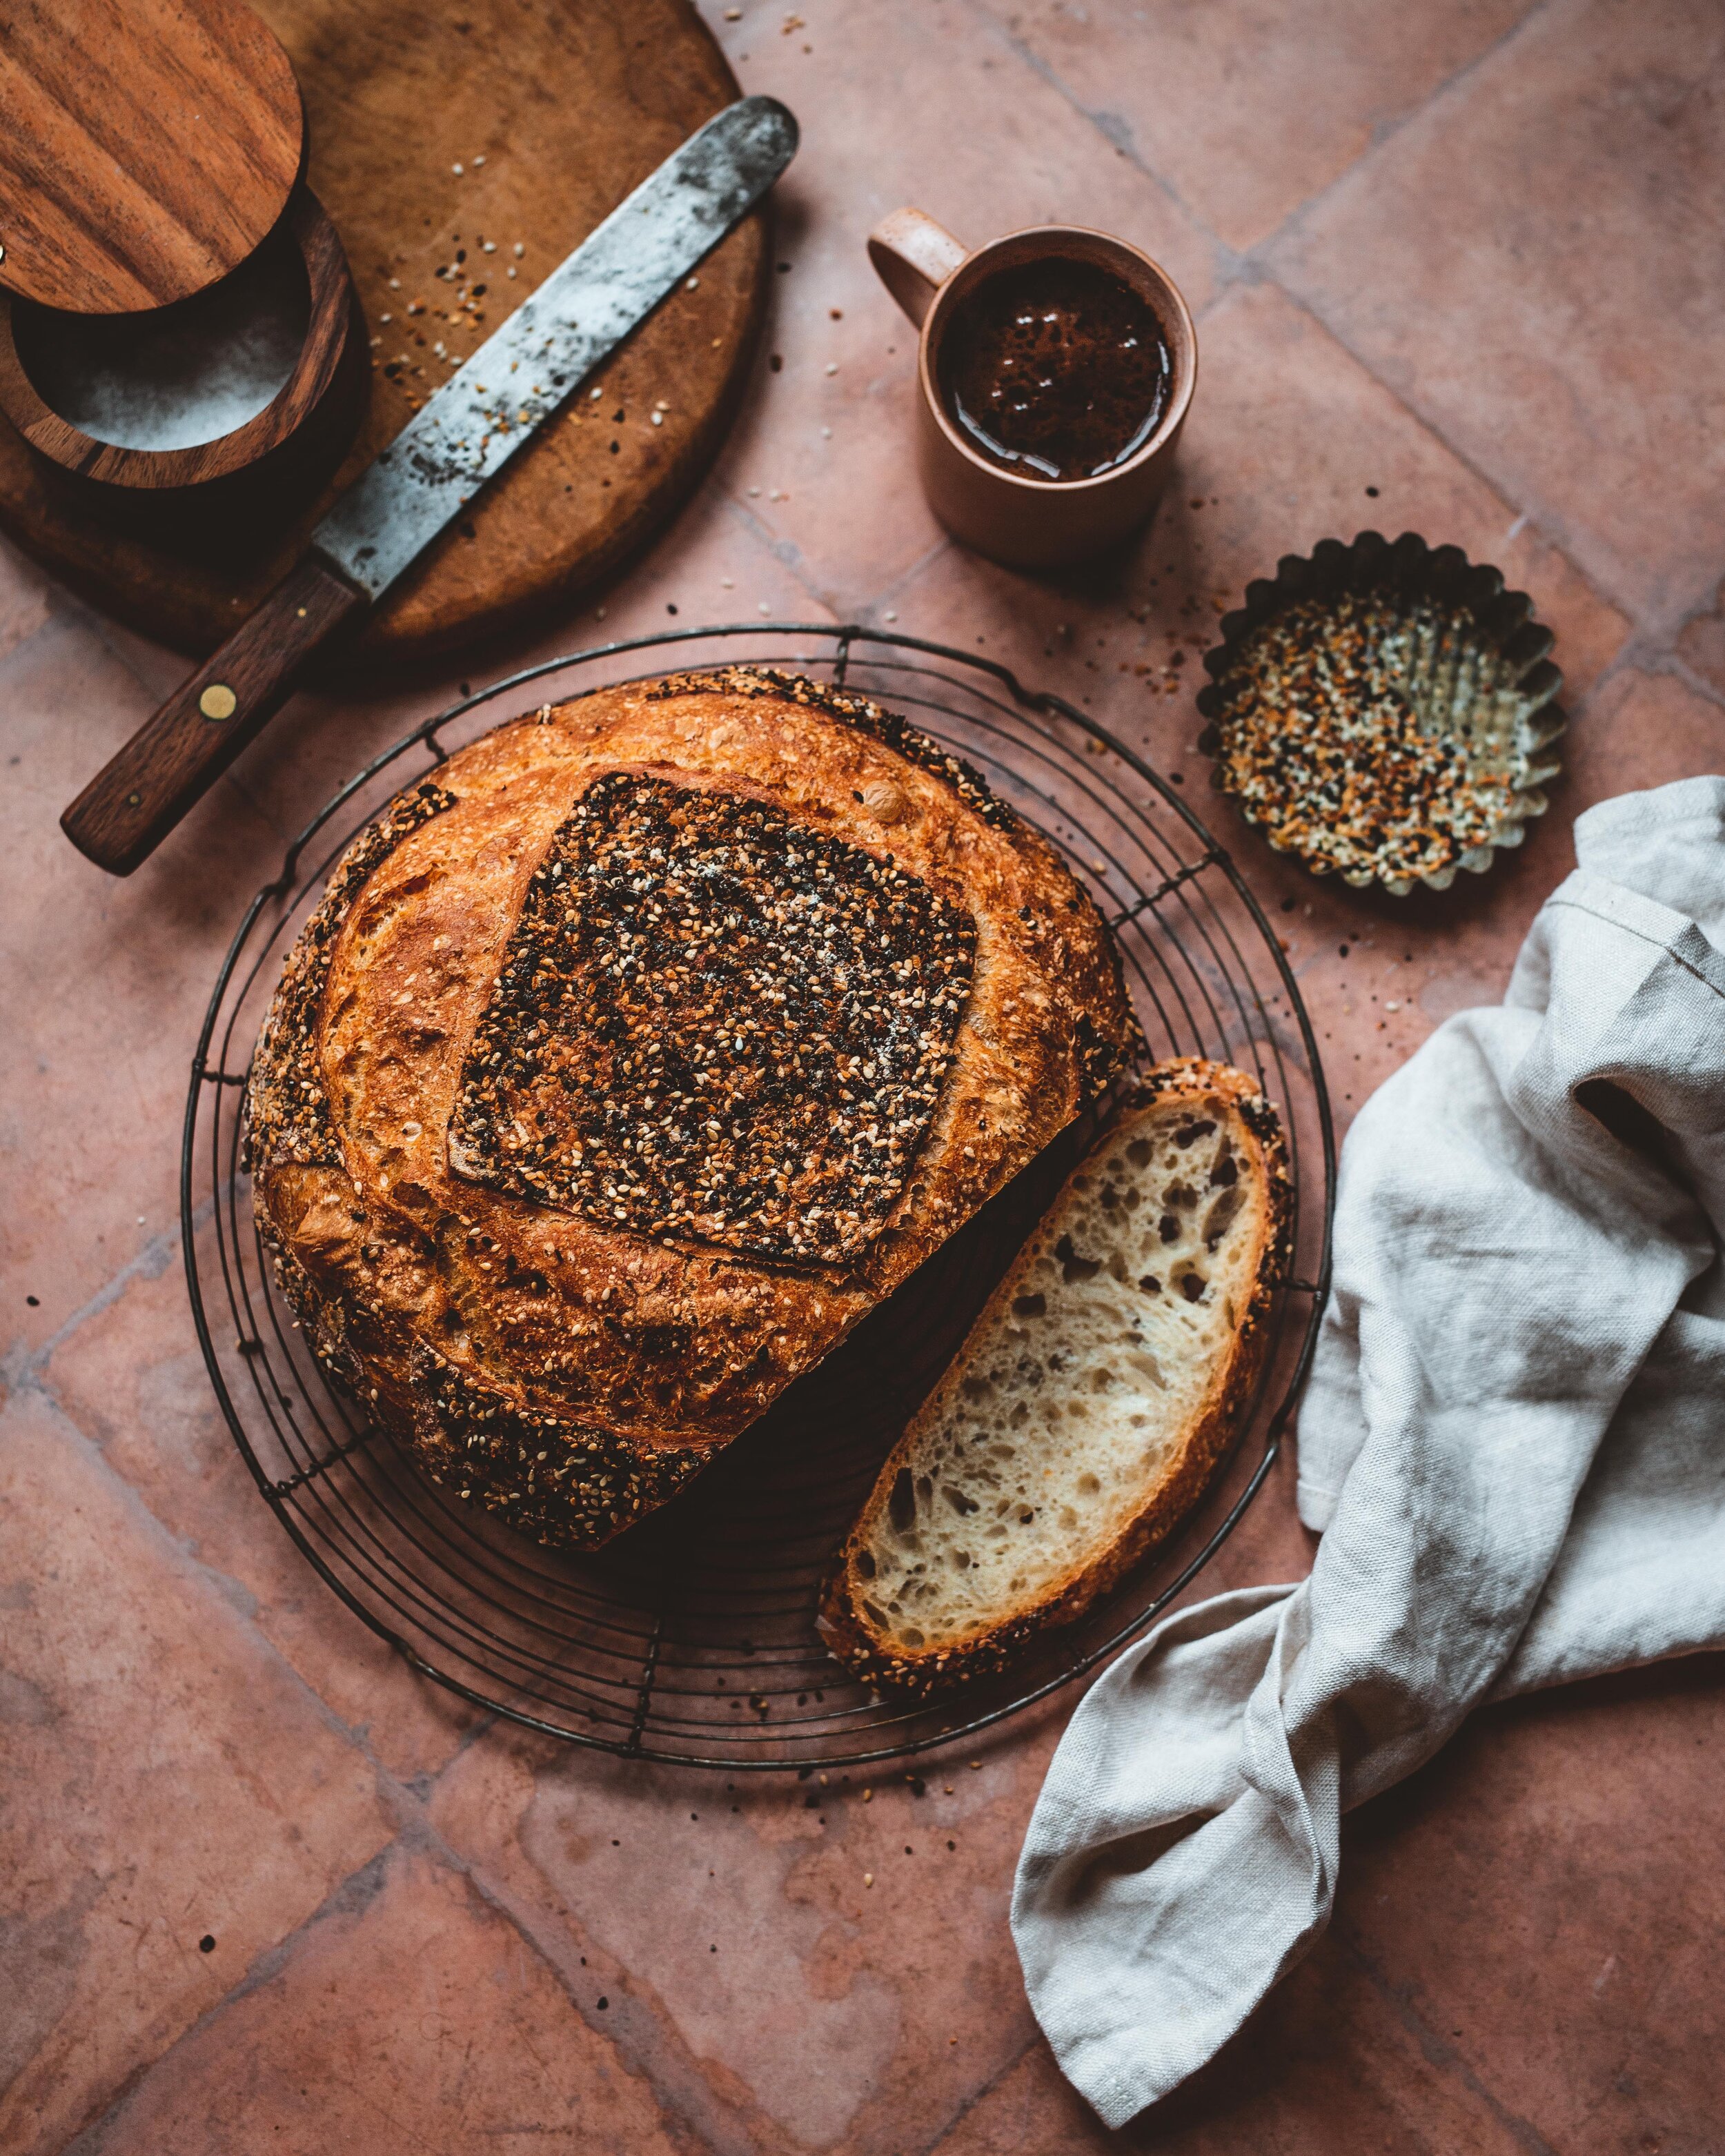
No knead bread is certainly not a new idea, it was pioneered by baker Jim Lahey and there are recipes for it all over the internet. My version follows the same basic idea I just make it with the addition of stretch and folds, building in strength to the dough but without any labour intensive kneading. It gives an ‘artisan’ style loaf, with a nice open crumb, but without the tricky element of sourdough. 

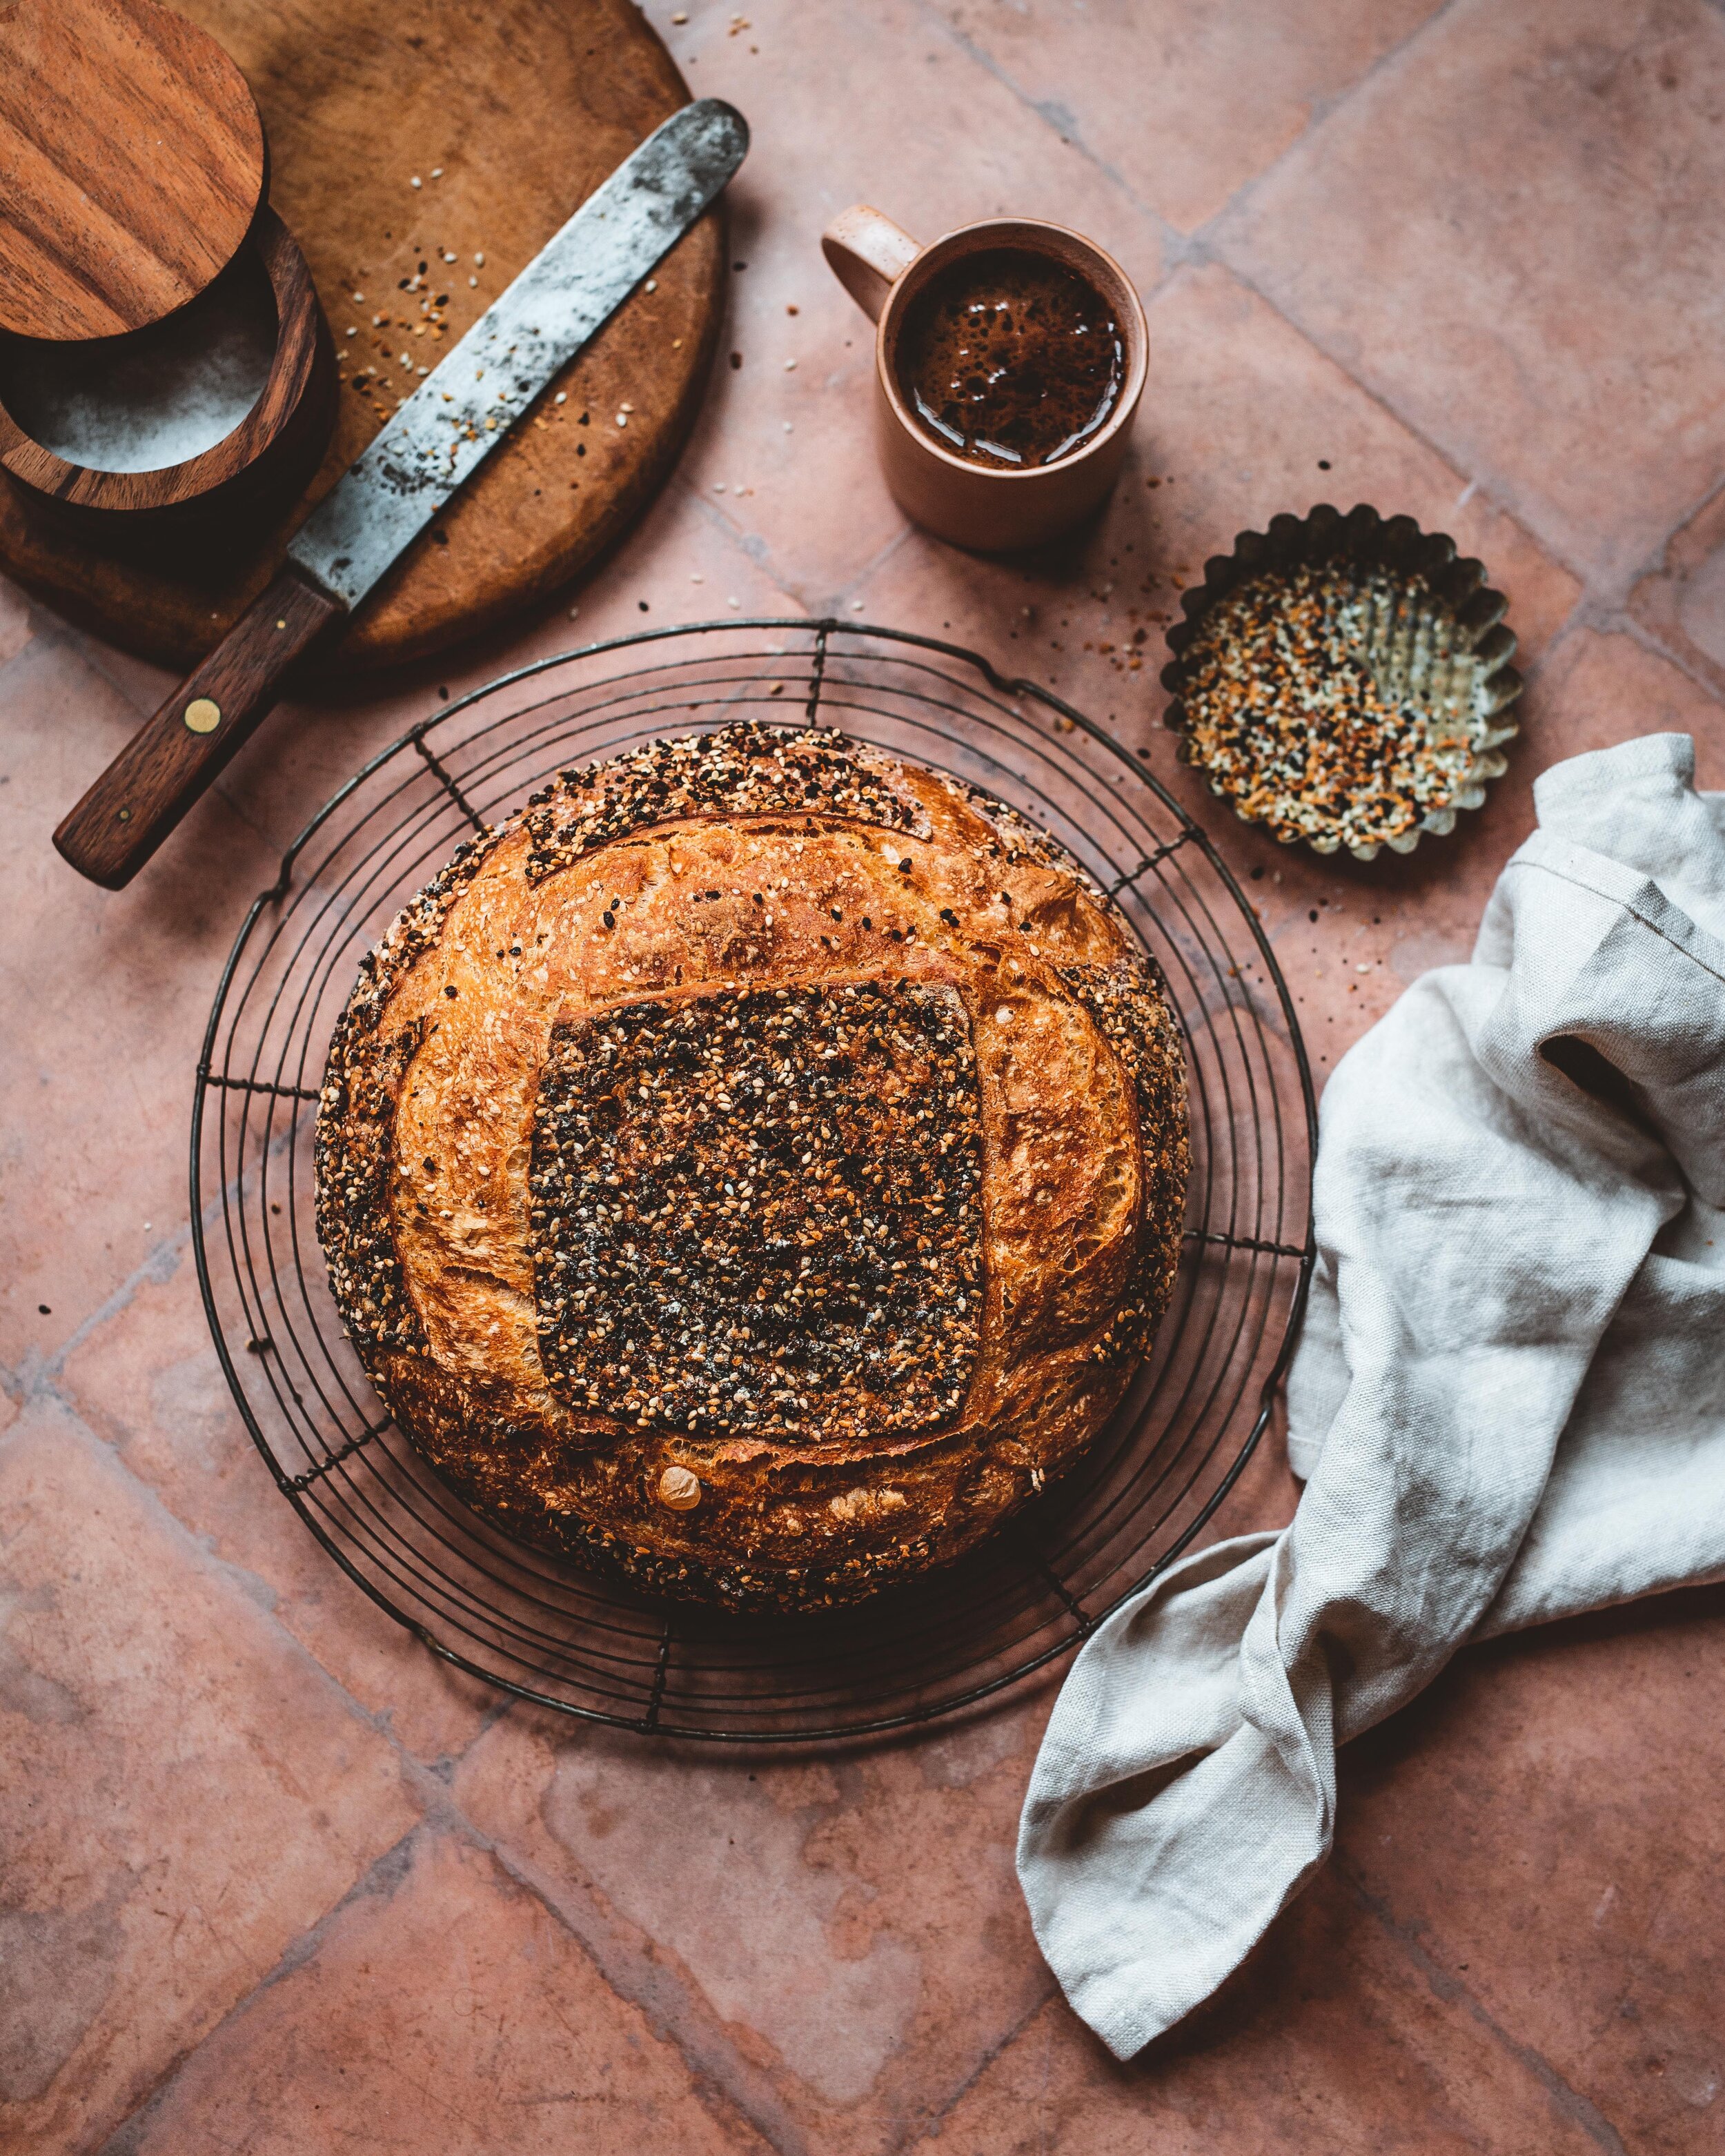
For this loaf I went with that cliche millennial flavouring of ‘everything bagel seasoning’ because, look it might be a cliche but, it’s great and I love it, and yes I sprinkle it on my avocado toast. You can make the seasoning yourself (I have a recipe for that here) or you can buy your own, your choice. 

No Knead Everything Bagel Bread

No Knead Bread
250g plain flour
250g strong white bread flour
400ml lukewarm water (see note)
2g fast action dried yeast
10g salt
2 tbsp everything bagel seasoning

Topping
4 tbsp everything bagel seasoning

Note - some people have found this dough tricky to handle as it is high hydration, if this is something you haven’t worked with before you can reduce the level of hydration to 350-375ml water which will make the dough easier to handle

To make the dough add the flours to a large bowl and mix together to combine. Pour in the water and use your hands to mix to a shaggy dough, making sure there are no dry pockets of flour. Cover the bowl and set aside somewhere warm for 30 minutes to hydrate. 

Sprinkle the yeast and salt over the dough and use a wet hand to mix together. To do this I first dimple the dough with my fingers, fold the dough a few times and then squish the whole thing through my fingers, making sure everything is well incorporated. Cover and rest for 30 minutes, again doing so somewhere warm.

Sprinkle the bagel seasoning onto the dough and do your first set of stretch and folds. If you’ve ever made sourdough you’ll know this process well, its a low effort alternative to kneading. To stretch and fold use a wet hand to go under the dough and pull it up and over itself, stretching as you do so. This is done at multiple points around the dough, 4 or 5 times. The video below shows the process when I make sourdough breads and it will look very similar for this recipe. After the first stretch and fold we are going to repeat the process 3 more times, resting for 30 minutes between each set in your warm spot. 

Once all your stretch and folds have been done we need to let the dough rest until doubled in size. This should take another 60-90 minutes depending on the temperature of the kitchen or warm spot your resting the dough. Personally I like using the oven with light turned on, just careful as some ovens can become a little too warm for this. 

Once doubled scrape the dough out onto a lightly floured work surface. Stretch out slightly and form into a rough ball. This is just a pre-shaping so do this briefly and don’t worry about making it perfect. Cover the dough with a kitchen towel and leave for 30 minutes to relax. Lightly flour the top of the dough and flip over and shape. The easiest way to do this is fold the outside edge the dough into the middle, working your way around the dough to make a nice tight ball. At this stage I then flip the dough, so the seam is on the bottom, and roll the dough on the surface creating tension and make the shape a little tighter. 

Spritz the ball of dough with water and sprinkle generously with your everything bagel seasoning. Carefully lift up and transfer to either a proving basket or bowl lined with a kitchen towel. Whichever you are using, dusting the inside with rice flour will help the dough release after proving. 

Cover the basket/bowl and refrigerate the dough for 8-14 hours (you should be able to leave it for 24 hours but 14 hours is the longest I have tested it so far). 

An hour before baking preheat the oven to 250ºC or as high as your oven will go. Place a large cast iron dutch oven to heat up as well. Once preheated remove the dough from the fridge and carefully turn it out onto a round of scrunched up parchment paper. Use a razor blade or sharp knife to slash the bread and carefully transfer it to the cast iron pot. Cover the pot with the lid and bake in the oven for 20 minutes. After the time is up reduce the temperature to 220ºC and bake for a further 20-25 minutes or until the bread is well browned. Remove from the oven and allow to cool for at least an hour before slicing. 

Example Baking Schedule
5pm - Mix the flour and water

5.30pm - Mix in the yeast and salt

6pm - Add the everything seasoning and do set 1 of stretch and folds

6.30pm - 2nd set of stretch and folds

7pm - 3rd set

7.30pm - 4th set

9pm - Pre-shape the loaf

9.30pm - Shape the loaf and refrigerate

8am - Preheat the oven

9am - Bake the bread

In Breads and Quickbreads Tags everything bagel, bread, no knead, bagel, sourdough, easy
33 Comments

Rhubarb Bostock

Edd Kimber January 18, 2021

Happy New Year! Is it too late to say that now? As it is my first post this year it felt appropriate, and I do really hope that 2021 has something better in store for all of us. I am in that wonderful period of January that means im in the middle of doing my taxes so you know what that means, baking as procrastination. In the cold and grey days of this month there are a couple things that thankfully brighten up the kitchen. I am talking about blood orange and rhubarb and it’s the latter I want to explore today. I grew up in Bradford alongside the area known as the Rhubarb Triangle, the home to Yorkshire forced rhubarb. Forced rhubarb is a protected variety that is grown, initially outside, but is then transferred to dark sheds where the rhubarb grows quicker than normal, as it searches for light, resulting in particularly tender rhubarb with a vibrant pink colour and a slightly sweeter flavour than its outdoor grown siblings. Its a very special ingredient and one I look forward to baking with every year. 

As I am knee deep in wrapping up a big project im excited about simple and quick recipes right now and this particular recipe is a great weekend treat that is incredibly easy. Bostock, for those of you are unfamiliar, is a classic French recipe, a great way to use up leftover and stale brioche. You take your stale bread, brush it with sugar syrup, top it with frangipane and flaked almonds. For my version I also added some fresh rhubarb. The bostock makes for a great brunch dish and because the frangipane and sugar syrup can be made a couple days in advance its a great roll out of bed and bake type of dish. 

Rhubarb Bostock
Serves 8

Brioche
8 stale slices of brioche
50g caster sugar
1/2 tsp vanilla bean paste

Frangipane
125g unsalted butter
125g caster sugar
1 large egg
125g ground almonds
300g rhubarb
4 tbsp flaked almonds

For the sugar syrup add the sugar, vanilla bean paste and 50ml of water to a small saucepan and place over medium heat and cook until simmering and the sugar has dissolved. Remove from the heat and set aside. This can be made and refrigerated up to a week in advance. 

For the frangipane place the butter and sugar into a large bowl and beat with an electric mixer until light and fluffy, about 5 minutes. Add the egg and beat to combine then finish by mixing through the ground almonds to make a thick paste. Again this mixture can be made and then refrigerate in advance, it will keep for a couple days before it needs using but bear in mind as it chills it will become firmer so you’ll need to let it warm up a little before using. 

When ready to make preheat the oven to 180C (160C fan) and line a baking tray with parchment. Brush the slices of brioche with sugar syrup, making sure to use all of it. Spread the frangipane over the brioche (you can either do this with a spoon, or pipe it on with a piping bag). Cut the rhubarb into small batons that fit on the brioche and place on top of the frangipane. Finish with a sprinkling of flaked almonds.

Bake the bostocks for about 25-30 minutes or until the frangipane is golden. Remove from the oven and allow to cool slightly before serving, still a touch warm. 

The bostocks are best on the day made but can be served a day later if you have some left over. 

In Breads and Quickbreads, Dessert Tags frangipane, almonds, ground almonds, rhubarb, bostock, french, easy, brunch
2 Comments
olive from spain.jpeg

Olive and Romesco Buns

Edd Kimber October 2, 2020

This post is sponsored by ‘Olives From Spain’

I don’t know if you have noticed, but my baking over the last few months has taken on a very specific feel. I’ve found myself turning to memories of holidays past to make up for our current situation, baking my way around the world in an attempt to recreate happy memories of holidays gone by. This recipe, however, is related to a holiday that never was. Earlier this year I was supposed to be visiting Madrid for the first time, but unsurprisingly it was cancelled. It was supposed to be a week of tapas, a week of sherry, basically a week of the best food and drink Spain could offer up. To give me some Spanish flavour right here in the UK, I decided to work on something full of Spanish ingredients, something to conjure up an idea of what that trip might have offered. I wanted to make something to highlight and compliment the flavours of Spanish Olives. I had in my kitchen some beautiful Spanish Manzanilla and Goral Olives, and a romesco style sauce seemed like a good pairing. The green Manzanilla olives have a really balanced taste with a delicate flavour, not too bitter or too salty. The green Gordal lives have a similar profile but they are firm and meaty in texture. Pairing those varieties with the the tangy romesco sauce seemed like a great way to show off those flavours and of course, the addition of a little manchego also helped the whole thing along. 

The recipe isn’t a classic Spanish idea but it uses the flavours and ingredients of the country in a style of baking I love. Romesco is sauce that is traditionally made from tomatoes, toasted nuts (a mix of almonds and hazelnuts is most common), garlic and small dried Nora peppers. For the version in this recipe I made a romesco-ish sauce, using the ingredients I most often have on hand, so it’s definitely not a traditional version but a nice option to whip up at home with ingredients you may already have on hand. 

Bread Dough
500g strong white bread flour, plus extra for dusting 
25g caster sugar 
1 teaspoon fine sea salt 
7g fast-action dried yeast 
250ml whole milk 
2 large eggs 
100g unsalted butter, room temperature, plus extra for glazing  

Romesco and Olive Filling
125g Spanish Green Manzanilla Olives
125g Spanish Green Gordal Olives
50g flaked almonds, toasted
1 roasted red peppers (jarred variety is fine)
2 large tomatoes
2 garlic cloves, peeled
2 small handful of flat leaf parsley, plus a little extra for decoration 
1 tsp smoked paprika
Pinch of chilli flakes
25ml extra virgin olive oil
2 tbsp sherry vinegar
125g Manchego cheese, grated

olive story.jpeg

For the bread dough add the flour, sugar, salt and yeast to the bowl of an electric stand mixer with the dough hook attachment and mix briefly to combine. Add the milk and eggs and knead on medium-low speed for about 10 minutes, or until the dough is smooth, elastic and pulling away from the sides of the bowl. With the mixer still running, add the butter, a little bit at a time. Once the butter has been worked into the dough, continue kneading for a further 10 minutes or so until the dough is once again pulling away from the sides of the bowl. Place the dough in a lightly greased bowl, cover with clingfilm and refrigerate overnight or for up to 2 days. If you prefer, you can let the dough rise at room temperature, but it’s worth making this in advance as the dough is much easier to handle when thoroughly chilled.

The next day, lightly grease or line the base of a 9x13 baking tin with a piece of parchment paper. 

For the filling roughly chop the larger Spanish Gordal Olives and halve the smaller Spanish Manzanilla Olives, setting aside for the moment. For the romesco sauce, place all of the remaining ingredients except the cheese into a food processor and process until a smooth sauce is formed. 

Remove the dough from the refrigerator and, working on a lightly floured surface, roll out into a large 40 x 50cm rectangle. Spread the romesco sauce evenly over the dough and sprinkle over the olives and the cheese, gently pressing into the romesco sauce. Roll the dough up, along the long edge, into a tight sausage. Use a serrated knife to cut into 12 equal sized pieces. Place the buns into the prepared baking tin and cover with clingfilm, setting aside for about an hour or so until the buns have almost doubled in size.

Meanwhile preheat the oven to 190C (160C Fan). Once proofed, bake in the preheated oven for about 30-35 minutes or until golden brown. 

Remove the buns from the oven and allow to cool. When at room temperature brush with a little extra melted butter and scatter over the extra parsley.  

Kept in a sealed container the buns will keep for a couple days, or can be frozen for up to a month.

In Breads and Quickbreads
1 Comment
Stromboli+3.jpg

Stromboli Recipe

Edd Kimber July 25, 2020

This post is sponsored by Doves Farm Organic Flour

Stromboli, an Italian American creation named after an Italian volcano, is maybe the perfect picnic recipe. A simple bread dough rolled up with all manner of fillings, it's a cross between a calzone and a sandwich. This is another collaboration with Doves Farm Organic Flour, so for the dough I use their excellent Organic Strong White Bread Flour. Find it in your supermarket in its new bright green packaging, very cheerful and summery. The dough itself is an incredibly simple affair made easily by hand or with a stand mixer. It is also a great basic bread dough that you could use for homemade pizza or even a simple loaf. It’s a great starting point if you’ve never made bread before.

The fun thing about this recipe is that it’s endlessly adaptable. Whilst I love the suggested filling, you can really play around with this recipe and make it your own. For my suggested filling I’ve kept it simple to keep it nice and easy to make. Quite often the rolled up bread is filled with a simple tomato sauce and this is of course delicious but, because this is on the wetter side, it can be trickier to assemble if you’ve never done it before. So, I’ve given an alternative that gives a similar tomato flavour but without adding a large amount of liquid - a paste made from tomato puree and olive oil with a few different seasonings.

When making any bread dough, choosing the flour you use brings with it one main question, and that is about the protein content. Using what us Brits refer to as a ‘strong’ flour means you are using a flour with a high protein content, for example Doves Farm Organic Strong White Bread Flour has a protein content of 13g per 100gProtein is important because the higher the protein the stronger the gluten development can be, making bread with chew and bread that rises better. So yes, you could make this recipe with plain flour but it will have a very different finished texture.

Doves Farm Organic Strong White Bread Flour is available from Sainsburys, Ocado and dovesfarm.co.uk

stromb.jpg

Stromboli
Serves 10

Simple White Bread Doug
500g Doves Farm Organic Strong White Bread Flour
7g fast action dried yeast
1 tsp fine sea salt
325ml lukewarm water

Filling
4 tbsp tomato puree
4 tbsp extra virgin olive oil
Pinch of salt and sugar
2 tsp dried oregano
1/2 dried chilli flakes
1/2 tsp garlic powder
16 slices salami
6 slices prosciutto
200g grated mozarella
125g grated cheddar/provolone/gouda (or other mild firm cheese that melts well)
1 jarred roasted red pepper, diced
1 large egg, lightly beaten
2 tbsp sesame seeds
Parmesan for grating

Stromboli 4.jpg

To make the bread dough place the Doves Farm Organic Strong White Bread Flour into a large bowl along with the yeast and salt, mixing together to distribute evenly. Add the water and use your hands or a stand mixer, fitted with a dough hook, to mix to form a shaggy dough. If making by hand tip the mixture out onto the worksurface and knead for about 10-15 minutes or until the dough is smooth and elastic. If making with a stand mixer knead on low speed for about 7-10 minutes or until smooth and elastic, pulling away from the sides of the bowl. Place the dough into a lightly greased bowl, cover with a towel and set aside for about an hour or until doubled in size. 

Whilst proving make the tomato paste. In a small bowl mix together the tomato puree, oil, salt, sugar, oregano, chilli flakes and garlic powder. Set aside for the moment. When the dough is almost done proving preheat the oven to 200ºC (180ºC Fan).

Once the dough has doubled tip it out onto a lightly floured worksurface and roll out into a square roughly 50cm x 50cm. Use a pastry brush to paint the tomato puree all over the dough, leaving a 2.5cm wide border, then layer on the toppings. You can do this in any manner you prefer but I start with the mozzarella followed by the salami then the second cheese and then the proscuitto, finishing with the diced pepper. Fold two of the dough borders (on opposite sides from each other) up and over the toppings creating a barrier on two sides that will help keep the fillings inside the bread. Roll up the bread dough, like you are making a batch of cinnamon rolls, with the folded over edges being on the outside edges of the roll. Once rolled up pinch all of the seams closed and place onto a large parchment lined baking tray, with the seam on the bottom. Brush the Stromboli with the beaten egg and sprinkle with sesame seeds and a little freshly grated parmesan. Use a sharp knife to cut a few vents in the top of the Stromboli and then bake, thats right no second rise for this recipe, in the preheated oven for about 45-50 minutes or until browned. Remove and allow to cool fully before serving. 

In Breads and Quickbreads Tags stromboli, italian, calzone, white bread, simple bread, picnic
2 Comments
  • Recipes
  • Older
  • Newer

Twitter

  • Was 8 original films, 3 spin off films, a two part play not enough. Can we have something new. https://t.co/cBZdGEGeyv
    Apr 4, 2023, 1:46 PM
  • RT @deliciousmag: Cacio e pepe, but make it buns! These seriously cheesy bread rolls from @TheBoyWhoBakes are inspired by his favouri… https://t.co/oDZlaDgnN2
    Apr 2, 2023, 11:08 AM
  • RT @TheDailyShow: Congrats to Donald Trump on finally winning a majority of votes! https://t.co/ezP55HZgl0
    Mar 31, 2023, 12:43 AM

Instagram

This weeks bonus recipe, for subscribers to my newsletter, is this gorgeous sour cherry and coconut gateau basque. The crust is a buttery cross between pastry and cake, think a cakey cookie. The filling is a layer of sour cherry topped with a rich coconut custard. A real fun one to make too! Link to my newsletter can be found in my bio - #gateaubasque #pastrycream #coconut #sourcherry
In this months @olivemagazine (out today) the team came and photographed my petit kitchen and we talked about how we put our stamp on the place, without spending a fortune. We hated the bland kitchen that we inherited but, as it was relatively new an
In this months @olivemagazine (out today) the team came and photographed my petit kitchen and we talked about how we put our stamp on the place, without spending a fortune. We hated the bland kitchen that we inherited but, as it was relatively new and in good condition, it felt a waste to rip it out and we also didn’t want to spend the money it would take to rip out the whole thing and replace it (it’s a howdens shell so we could have done something cheaper like @plykeakitchens @holte.studio @madebyhusk) so instead I painted all of the cabinets, using @makeitrustoleum kitchen cabinet paint, to give it some personality and lighten the whole thing. Check out the magazine for the full run down. - #kitchendesign #kitchenremodel #rustoleumcabinettransformations #rustoleumkitchencupboardpaint #kitcheninspiration #theboywhobakes #olivemagazine
Are you making scones all wrong? Maybe, maybe not? But I do want to show you how I make them! This recipe is based on the method I learnt at @belmondlemanoir 12 years ago when I did a stage, and it makes the absolute lightest scones. And shock horror, it involves kneading the dough, albeit very lightly. You can get the full recipe in this weeks newsletter (free) linked in my bio. - #scones #bakingday #worldbakingday #afternoontea #hightea #englishscones #clottedcream #creamtea #theboywhobakes
facebook
  • Contact

The Boy Who Bakes

Edd Kimber

facebook